
The title may be long, but this bread is very simple to make. It's so simple, I've decided to get the kids to do all the work.

I grew up baking with my mom, and she grew up baking with her mom. We, of course, baked all kinds of cookies, cakes, breads, muffins, etc, using good old fashioned white flour, sugar, butter, eggs, etc. And it was a great way to learn. I became an instinctive baker, able to whip up a simple recipe without a recipe. When I switched over to a healthier lifestyle, it became a challenge to continue my love of baking. I'm not really into overly complicated baking, especially with gluten free flours. I've tried pre-made gluten free flour blends and have yet to find a good one. I don't like combining several different flours or adding starches and what-not. So, for now (and pretty much for always) my go to flour in sweet baked goods is brown rice... And cooked quinoa (!).
I'm not a fan of complicating things, and since I've become a mother, I am really not a fan of complicating things. We don't avoid gluten altogether, but incorporating foods and treats that give us a break from excessive wheat intake is always a good thing. And, my goodness, if you have kids, you know how hard it is to avoid wheat!

We're starting with four medium sized bananas. The riper, the better. These are OK, it's what we have, so they will do.


Have your kids peel the bananas.
Note: Of course, you can peel your own bananas, you can make this whole recipe yourself, if you want some peace and quiet.


Break and mush those bananas into pieces.

Once the bananas have been mashed and chunked (and those little hands have been washed), melt 1/3 cup of butter. I'm using a good salted butter, but you can use which ever type of fat you're comfortable with. Coconut oil goes really well here, as does goats cream butter. Your choice!


Mash the bananas just a bit more before adding the melted butter. Once added, mash away until nicely incorporated.

We're going to add two eggs to our banana & butter mixture. Now, I am absolutely going to let these kids handle the eggs on their own. They will crack them and beat them without my help. As someone who has become completely shocked and overwhelmed by the amount of messes kids make, the task of teaching and remaining patient while these two learned how to crack eggs on their own was a true challenge, and their ability to do this on their own is a true achievement on my part (it's the little things, right moms?)


Deep Breaths, Mama, they are doing fine.


Whisk those eggs and pour them into the banana & butter combo. Allowing kids to do their own pouring is my newest achievement. High five!

With a whisk, combine until well incorporated.

Add 1/4 cup of pure maple syrup to our whisked banana egg mixture. Now, in all honesty, this recipe does not need it. Bananas are sweet enough, as are the chocolate chips we are going to add at the end. So this step is entirely up to you.

Puree the banana mixture until smooth.
My little beans have a lot of experience with the submersion blender. They've made smoothies, soups and, of course, banana bread with me while 'helping' me hold it. They've worked their way up to using it without my physical assistance. This step is not totally necessary and you can omit pureeing your wet mixture further if you'd like, and certainly, if your child has never used one of these guys, help them to use it. While I have over-protective tendencies and kid messes give me mild, silent panic attacks on a daily basis, I try to adhere to the concept that kids can benefit from using grown up tools, climbing up the slide and can generally get through life just fine without hearing the words "BE CAREFUL" over and over again. Plus, I'm not a fan of banana chunks in my banana bread...and I was holding the camera.

Shooting the photos for this post exposed a secret ingredient that, until now, they had no idea was in the bread. I had to take that risk for the sake of the art.
We're adding 1 cup of cooked quinoa. Now, 1 cup of cooked quinoa contains about 8-10 grams of complete protein - meaning it contains all of the essential amino acids (many vegan protein sources do not!) and about 5 grams of fibre, plus many important vitamins, minerals, anti-oxidants and phytochemicals. HOWEVER, it also adds a lovely quality to any quick bread. Quinoa is great at holding in moisture and so contributes greatly to the texture of this bread, making it soft and chewy. It pretty much disappears, texture and flavour-wise (which is why my insanely picky eaters didn't know it was an ingredient until just now). I had to reassure them that they have, in fact, eaten it before and that they will survive if they eat it again.


Dump the cooked quinoa into the bananas, stir and set aside.

In a separate bowl, we're adding our brown rice flour.

2 cups of brown rice flour in total, along with 1/2 tsp sea salt, 1 tsp baking powder and 1/2 tsp baking soda. Give all of that a gentle stir.


We're adding a pinch of nutmeg and 1 tsp of cinnamon. I trained them young to understand what a pinch of this and a splash of that means. Two very freeing concepts in the world of cooking.

Now we can pour our dry mixture into the wet. As my four year old tips the bowl full of flour, my muscles tense up, my breathing shallows and sweat starts to bead along my forehead. I'm holding in my "Be Careful!"s and "Don't Spill!"s. We will get through this, Meghann.
And look at that, success!


Activities like egg cracking, whisking, blending and stirring with a wooden spoon are not easily shared between a 6 year old and a 4 year old. There is no waiting your turn when it comes to stirring this awesome goo with a big old spoon. So they will simultaneously, gently stir our batter together.

And if you foolishly thought that the addition of the chocolate chips would be peacefully shared, you were wrong.


Add about 1/2 cup of dark, semi-sweet chocolate chips. I've instructed them not to pinch any until we've completed our bread, but they are clearly being defiant. Who can blame them.


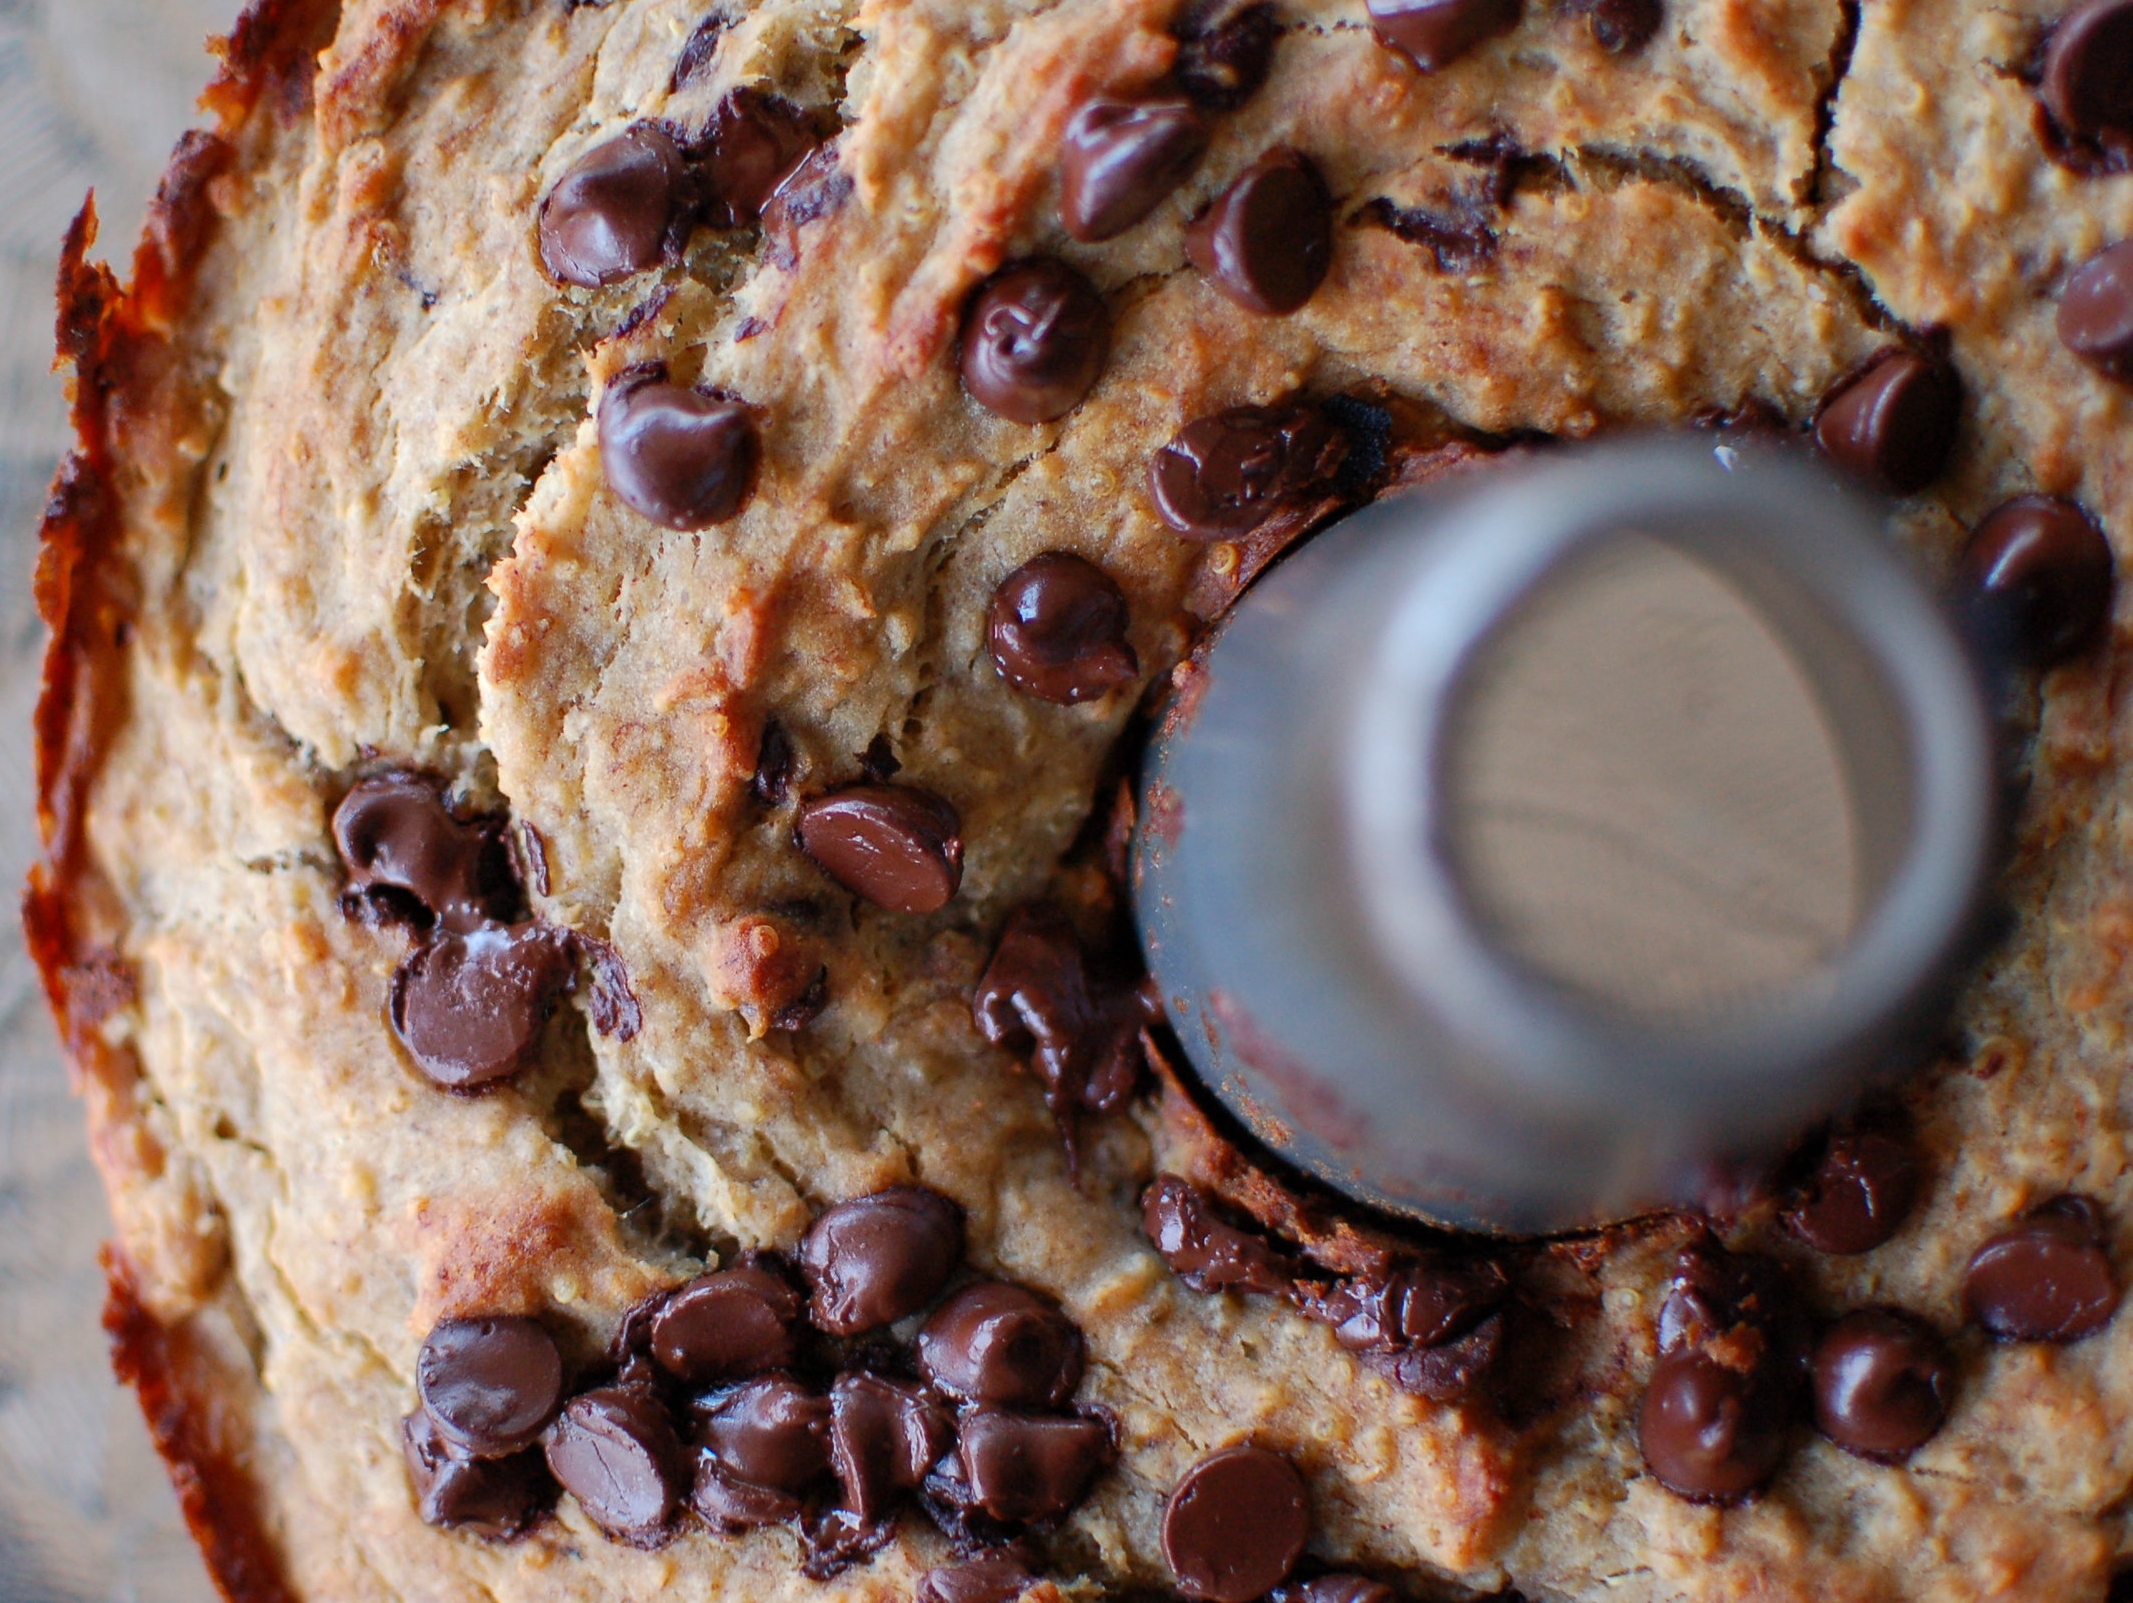
We're buttering up a bundt pan for this bread. It's mostly just for fun, but I quite like the way quick breads bake up in these pans. The heat is evenly distributed and the cooking time seems to be a bit less. I often find that, when using gluten free flours in a loaf pan, they can over-cook on the top and edges and under-cook in the centre (to the point of a bit being raw). The bundt pan seems to solve that dilemma.

I will admit that I did help to get the batter into the pan, as that task is quite challenging for wee hands. They, however are in charge of the chocolate chip topping. Once satisfied with the finishing touches, pop the batter into the oven for about 30 minutes at 350 degrees F.

And voila! A beautiful creation. Slightly brown and crisp on top, scattered with slightly melted chocolate chips. The inside is perfectly moist and deliciously sweet.

Kid Approved Chocolate Quinoa Banana Bread
- 4 ripe bananas
- 1/3 cup melted butter (or coconut oil)
- 2 eggs, beaten
- 1/4 cup pure maple syrup
- 1 cup cooked quinoa
- 2 cups brown rice flour
- 1/2 tsp sea salt
- 1 tsp baking powder
- 1/2 tsp baking soda
- Pinch of nutmeg
- 1 tsp cinnamon
- 1/2 cup chocolate chips + more for sprinkling (optional)
- Peel & mash the bananas
- Add the melted butter, eggs & maple syrup, mash further or puree with submersion blender
- Add cooked quinoa, set aside
- Combine all of the dry ingredients except for the chocolate chips
- Add the dry ingredients to the banana mixture
- Stir until combined
- Stir in chocolate chips (optional)
- S batter evenly into a greased loaf or bundt pan
- Sprinkle with chocolate chips (optional)
- Bake in a 350 degree F oven for 30 minutes, or until a knife inserted into the centre comes out clean.
